If you were like me, you grew up playing the Nintendo Entertainment System (NES for short.) I loved spending hours upon hours playing favorites like Wizards and Warriors, Legend of Zelda, Mike Tyson's Punch Out, and Super Mario Brothers.
When I got my first cell phone I bought a USB cable for it and loaded up
Bitpim (I will talk about this on another post.) Basically, Bitpim allows you to have access to all of your data in your phone, edit it and even back it up. There are programs that you can buy from some carriers that package the cable with software, but they run from $50-$99. The newer "smart phones" like the iPhone or Android-based phones allow you to hook up your phone via USB cable and mount it as a storage device without any external software. Having this capability will enable us to transfer the ringtones when we rip them from the NSF's.
First things first, you are going to need a way to read the NSF's.
Zophar's Domain is a great site for all your Emulator and ROM hacking needs. I chose
G-NSF as it gives you the ability to export .wav files which we can then manipulate. Once you download and install G-NSF it's time to find some Nintendo Sound Files. Zophar's Domain has what we need again. Venture over to the site and
pick a couple of your favorite games.
Once you have downloaded your favorite games (I'll be using Legend of Zelda for this example) you can open G-NSF and load your NSF. Click File> Load NSF... and pick your NSF.
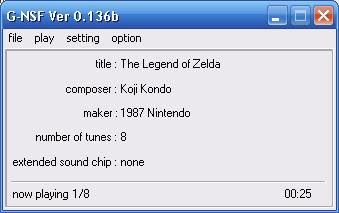
Once you have your NSF open you can choose what tune to export. For each NSF you can there can be anywhere from three to an infinite number of tunes. Some NSF's hold each and every blip and bleep you might hear in a game so it's important you find the right tune to export. For Legend of Zelda the first tune is the opening theme song so that's the one we want.
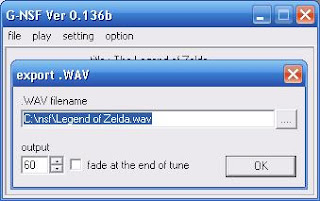
The next step is to export the tune as a .wav file. We do this by choosing File> export .wav. This will bring up a box that asks you which path you want to export the .wav file to. I chose the root folder of where I have the rest of my NSF's. This also lets you choose how many seconds of the tune that is exported. I input 60 here as that covers me just in case, but you could probably get away with 30 seconds.
Once you export the .wav file and save it we have to open it up in a free program called
Audacity. In order to export to mp3 when we are all done you will need the LAME encoder. I won't be going into too much detail on how to install LAME and use it in conjunction with Audacity because they have a great step-by-step on their
website explaining how to do so.

Open the .wave by going to File>Open... and find your .wav file. Once you open your wave file there are a couple things left to do to make your .wav ringtone-ready. The first thing you'll want to do is press CTRL+A and select all (or choose that from the menu Edit>Select>All.) Once you do that you can then choose certain Effects.
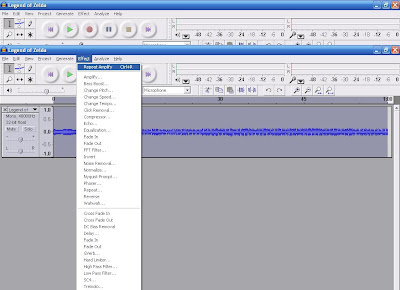
The first one I chose was Bass Boost. The bass seems to be lacking on the .wav exports when it gets transferred over to the phone.

Your going to choose Effect>Bass Boost. I just leave the default values and it sounds pretty good. If yours are different you can play around with it or copy my values above.
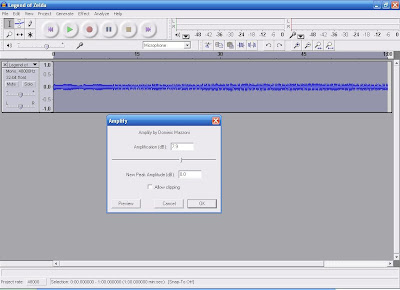
Next we will choose Effect>Amplify. Again, I just allow Audacity to choose my levels. You'll see if you take it any higher dB it will start to clip so the default levels are fine. After that click play and make sure it sounds good.
NOTE: It is important that you choose Bass Boost first THEN Amplify or else the mp3 will clip and sound distorted.If it sounds good, click File>Export as MP3 and rename it whatever you want (I kept the same name as my .wav Legend of Zelda.) When you first export the .wav as a .mp3 Audacity will ask you where your LAME encoder file is. You'll have to find where you put it from earlier when you installed it. When the box comes up to input ID3 tags you can either input information or skip it. I just chose the genre to be "Game." What's great is now that you know how to export tunes from the NSF's you can export smaller tunes like Mario grabbing a coin or hitting a block. You can set these as your notification ringtones as well and get a full theme going!
Finally, we have our ringtone!
Legend of Zelda Ringtone. From here you can connect your "smart phone," mount as a storage device, and transfer the files. Another way to get the mp3 on your phone is to email them to yourself. Usually phone carriers have a special email that uses your 10 digit cell number like so: 6095551212@verizon.com or 6095551212@attwireless.net If you really are stuggling to get the ringtone on your phone I will be writing a short tutorial on how to use Bitpim soon.
If you are confused or have any questions, please don't hesitate to ask in the comments and I'll do the best I can to answer them.
Bonus: Here's two extra ringtones I whipped up from Castlevania 2.
Castlevania 2: Silence of DaylightCastlevania 2: Bloody Tears
 For those of you that don't know, I'm the systems administrator for a non-profit organization. I work on numerous projects throughout the day, but there is a lot of fun to be had with some of the donations that we get in as well. One of these donations happened to be a Dell Latitude C840. Depending on the speed and condition of the hardware we get in, I choose various operating systems to be installed. More often then not I choose a flavor of linux.


